Network Troubleshooting Process
Mastering the 7 Step Method of Network Troubleshooting Process
Troubleshooting is one of the most critical skills in any network administrator’s toolkit. With so many variables influencing performance, from physical cabling to advanced protocol configurations, a structured, methodical approach becomes essential. While no two network issues are identical, the 7-step troubleshooting process provides a repeatable framework that helps ensure nothing gets overlooked.
Let’s walk through this structured process that transforms chaotic symptoms into clear resolutions.
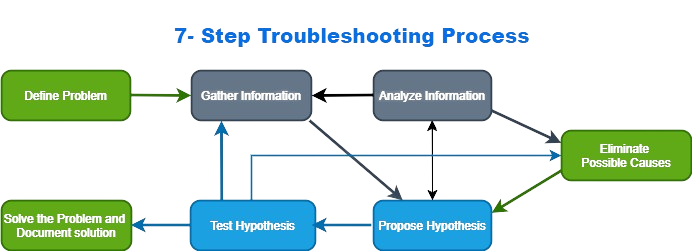
7- Step Troubleshooting Process

1. Define the Problem
The first step in effective troubleshooting is simply recognizing that a problem exists and clearly defining it. Often, problems are first reported as vague user complaints like “the network is slow” or “I can’t access my email.” At this stage, the goal is to gather enough detail to understand what is actually not working. Is the issue limited to one device, a subnet, or the entire network? Is it a performance issue or a complete loss of connectivity? Without a clearly defined problem, efforts to fix it can be misdirected or incomplete.
Question End Users
Guidelines | Example Open-Ended End-User Questions |
Ask pertinent questions. |
|
Determine the scope of the problem. |
|
Determine when the problem occurred / occurs. |
|
Determine if the problem is constant or intermittent. |
|
Determine if anything has changed. | What has changed since the last time it did work? |
Use questions to eliminate or discover possible problems. |
|
2. Gather Information
Once the problem is defined, it’s time to gather relevant data. This includes technical logs, monitoring alerts, recent configuration changes, and, importantly, user input. Tools like
ping, traceroute, show ip route, or even SNMP monitoring systems can help identify where along the path the issue may be occurring. In many cases, the quality and scope of the data collected at this step will determine how quickly the issue can be resolved.3. Analyze the Information
After collecting data, the technician must make sense of it. This means interpreting interface statistics, routing behavior, application logs, and user reports to identify patterns or anomalies. At this point, the administrator may compare current network behavior against documented baselines or rely on historical knowledge. The goal is to correlate symptoms with potential causes. Sometimes, even subtle discrepancies in CPU usage, error counters, or topology changes can provide crucial clues.
4. Eliminate Possible Causes
Next, the focus shifts to narrowing down the issue. With several possible root causes identified, the process involves eliminating them one by one. This often means running tests or temporarily isolating segments of the network to see where normal behavior resumes. It’s a process of intelligent deduction, not guesswork. Technicians may loop back through earlier steps here as new evidence comes to light
5. Propose a Hypothesis
With the most probable cause identified, it’s time to form a solution. This involves proposing a hypothesis: If we take a specific action, whether it’s changing a configuration, replacing a cable, or adjusting routing, will the issue be resolved? For experienced technicians, intuition and historical context often guide this step, but even newcomers can succeed by carefully reviewing their findings.
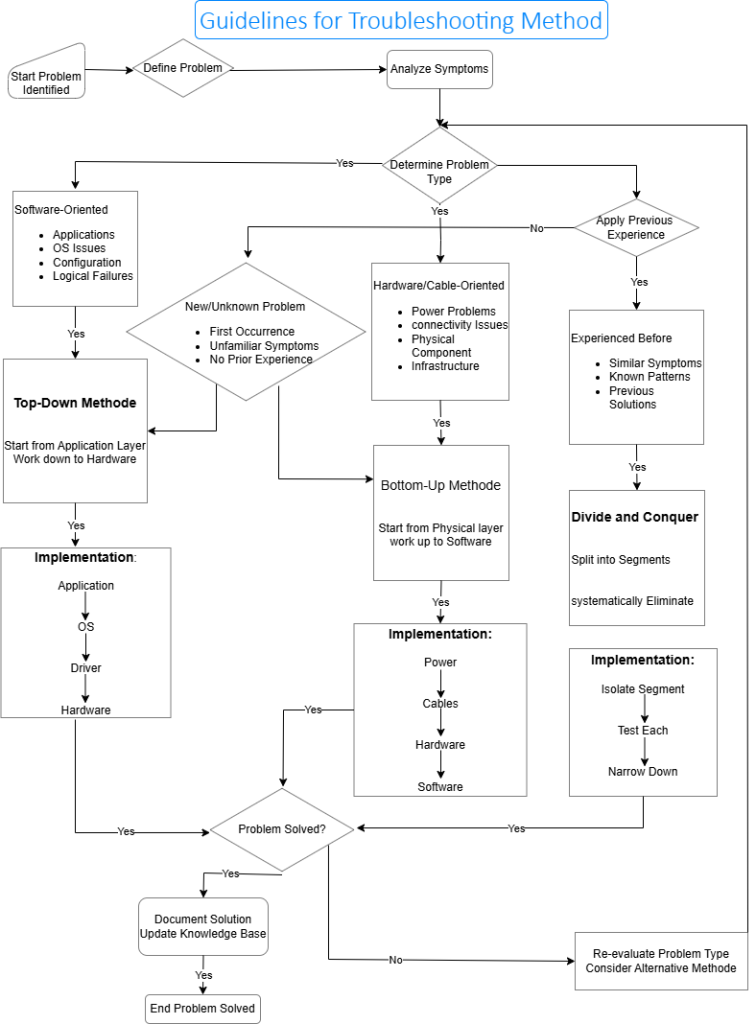
Guidelines for Selecting a Troubleshooting Method

6. Test the Hypothesis
Before rushing to implement the fix, it’s essential to consider the potential impact. Will this solution disrupt other services? Is a rollback plan available if it fails? Ideally, testing is done in a controlled environment or during a maintenance window. If the solution does not resolve the problem or creates new issues, the technician must reverse the changes and revisit the analysis stage.
7. Solve the Problem and Document It
Once the problem is resolved, it’s important to notify users, update incident records, and, most importantly, document what happened. Proper documentation ensures that if the same issue arises again, others on the team won’t have to start from scratch. Recording the symptoms, root cause, solution, and impact allows the organization to build a knowledge base that reduces future downtime and troubleshooting time.
This 7-step model isn’t just a checklist, it’s a mindset. By following a consistent troubleshooting approach, network administrators can reduce stress, minimize service disruptions, and solve even the most complex issues with confidence.
Network Troubleshooting Process
Troubleshooting Key Commands & Concepts
Troubleshooting Key Commands & Concepts
Cisco IOS Commands
- show version : Device uptime, OS, hardware info
- show ip interface brief : IP & status overview
- show interfaces : Interface errors & status
- show ip route / ipv6 route : Routing table
- ping / traceroute : Basic connectivity test
- telnet / ssh : TCP session testing
- debug : Real-time logs (use with care!)
- show running-config : Current config
- show cdp neighbors detail : Device discovery
- show mac address-table : Switch MAC mapping
- show vlan : VLAN details on switches
Windows Commands
- ipconfig /all : Detailed IP config
- ping / tracert : Connectivity tests
- arp -a : ARP cache for IPv4
- netsh int ipv6 show neighbor : IPv6 neighbors
- route print : Local routing table
- nslookup : DNS query
- telnet [ip] [port] : Test specific ports
Linux/macOS Commands
- ifconfig / ip a : Interface info
- ping / traceroute : Network reachability
- ip route / netstat -r : Routing table
- arp -n / ip neigh : ARP/Neighbor table
- dig / nslookup – DNS troubleshooting
- nc -zv [ip] [port] : Port scanning
- journalctl -xe : View system logs
Key Network Concepts
- Baseline : Performance benchmark
- Syslog : Event logging protocol
- SNMP : Monitoring & management
- ACL : Access control rules
- NAT : IP address translation
- VLAN : Virtual LAN segmentation
- MAC Table : Port-to-MAC mapping
- Neighbor Table : IPv6 address resolution
- CDP / LLDP : Discovery protocols
- SLAAC : IPv6 auto-configuration
5
1
vote
Article Rating
Subscribe
1 Comment
Oldest
Newest
Most Voted
Inline Feedbacks
View all comments
Jean Claude Munyakazi
7 months ago
0
